Synology DDNS (Dynamic DNS) is a service provided by Synology Inc. that allows you to map a static domain name to a dynamic IP address. With Synology DDNS, you can create a custom domain name, such as example.synology.me, and associate it with your NAS device’s current IP address. Now plenty of users are facing “Synology DDNS Not Working” issue.
[quads id=1]
Synology DDNS allows you to access your Synology NAS (Network Attached Storage) device from anywhere in the world using a domain name instead of an IP address, which may change frequently if you have a dynamic IP address assigned by your Internet Service Provider (ISP).
Read : Fix ‘Rapid-Cloud.co Refused to Connect’ Problem
So friends if Synology DDNS stopped working for you, then this article could help you to fix Synology DDNS not working issue.
[quads id=1]
Why is Synology DDNS Not Working?
The Synology DDNS service is free for Synology users and can be configured easily within the Synology DiskStation Manager (DSM) software. There could be several reasons why is the Synology DDNS Not Working. Here are some possible causes.
- Incorrect Configuration – The most common reason why Synology DDNS may not work is due to incorrect configuration settings. Ensure that the settings for your DDNS provider are correctly configured, including your username, password, and domain name.
- Firewall or Router Issues – Your firewall or router may be blocking the ports necessary for DDNS to function correctly. Ensure that the ports are open and that the DDNS service is allowed to pass through.
- DNS Issues – The DDNS service may be experiencing DNS issues, causing it to fail. Check with your DDNS provider to ensure that their service is operational and that there are no issues on their end.
- Expired or Invalid Account – If your DDNS account has expired or is invalid, the service will not work.
- Server or Network Issues – There may be server or network issues that are causing the DDNS service to fail.
- IP Address Changes – If your IP address changes frequently, you may need to update your DDNS settings to reflect the new IP address.
- DDNS Provider Limitations – Some DDNS providers have limitations on the number of requests or updates that can be made in a given period.
Read : How to Clear DNS Cache in Windows 11 (2 Ways)
[quads id=1]
How to Fix “Synology DDNS Not Working” Problem?
If you’re experiencing issues with the Synology DDNS Not Working, here are some ways to fix the problem.
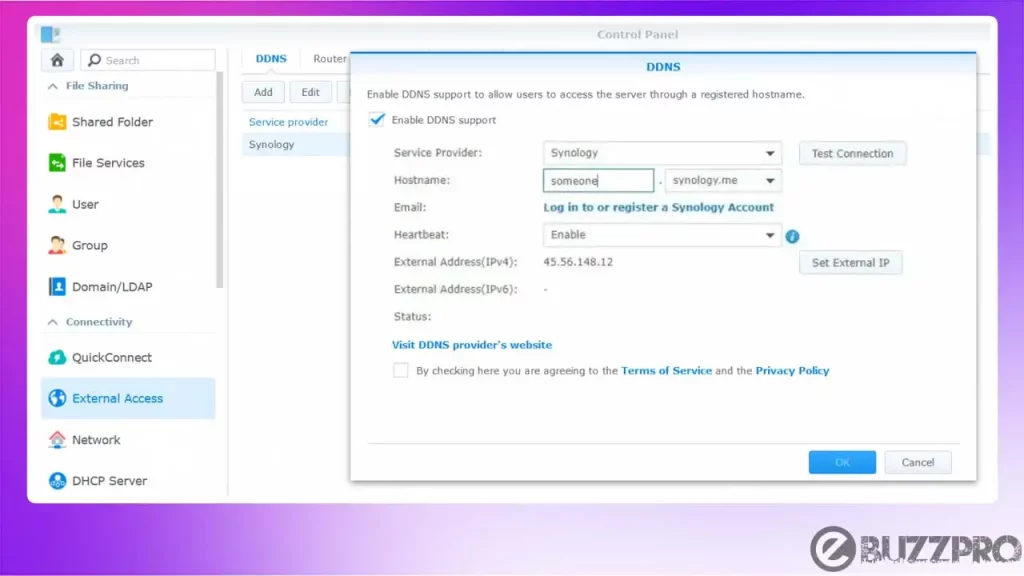
1. Verify your DDNS settings
Check that your DDNS account settings are correctly configured. Ensure that you have entered the correct username, password, and domain name.
2. Check Your Router and Firewall
If still you’re experiencing Synology DDNS Not Working issue, Ensure that your router or firewall is not blocking the ports used by your DDNS service. You may need to open specific ports or allow the DDNS service to pass through the firewall.
[quads id=1]
3. Update Your IP Address
If your IP address has changed, you may need to update your DDNS settings to reflect the new IP address. Many DDNS services have an option to detect your IP address automatically, or you may need to manually update the settings.
4. Check for DNS issues
Verify that your DNS settings are correct and that there are no DNS issues. Try pinging your DDNS domain name to see if it resolves to the correct IP address.
5. Check Your DDNS Provider’s Status
Check with your DDNS provider to ensure that their service is operational and that there are no known issues.
Read : Fix ‘TranslucentTB Not Working Windows 11’ Problem
6. Renew Your DDNS Account
If your DDNS account has expired or is invalid, you may need to renew or update it.
[quads id=1]
7. Consider Using a Different DDNS Provider
If you have exhausted all troubleshooting options and are still experiencing issues, consider using a different DDNS provider.
Conclusion – Friends, how did you like this “Synology DDNS Not Working” article? Do tell us by commenting below. Also, do share the post with your friends.